

See if this sounds familiar. You found a great pattern, the blanket is adorable, the yarn is delicious, and you’ve got a fresh Diet Coke waiting for you and nothing else on the calendar. Netflix is loaded up with your latest fixation and you’re feeling great.
You fork over the $6 for the pattern and crack that baby open. You read the intro, then you start scrolling and see this mess of nonsense.
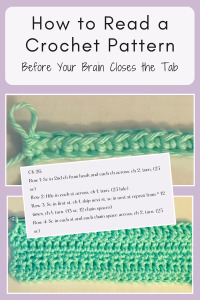
Ch 1, sc in first st, ch 1, skip next st, sc in next st repeat from * 12 times, turn. (13 sc, 12 ch sp)
And as you try to uncross your eyes, your brain very slowly and dramatically closes the tab.
Don’t worry we’ve all been there.
But here’s what no one bothers to tell you about crochet patterns when you first get started. First of all, not all creators write the same way. Which means not all patterns are going to read exactly the same. It would be great if that were the case, but I’m here to tell you, it’s not. Second of all, that wall of letters and unintelligible numbers that your brain couldn’t decipher isn’t hard. (Put the pitchforks down I’m not done yet)
It’s not hard because it’s literally just written in shorthand.
Someone did it long ago to write the pattern down to save space on the paper, and then didn’t bother to hand you the decoder ring. It’s a whole new language with it’s own vocabulary, and it’s own rules, And like any new language you see for the first time, it’s going to look overwhelming and impossible to figure out. At least until someone explains the rules to you. (By the way, I’ve been doing this for twenty years and I still read some patterns three times and feel completely lost. So you’re definitely not alone if you can’t make sense of a pattern.)
So let’s do this. By the time you get to the bottom of this post, you’re going to read that scary block up there and know exactly what it’s telling you to do.
Heads up: My posts may contain affiliate links! If you buy something through one of those links, you won’t pay a penny more, but I’ll get a small commission, which helps keep the lights on! Thanks!
So I bet you’re asking how do we get from this: 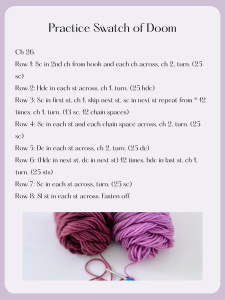
To this: 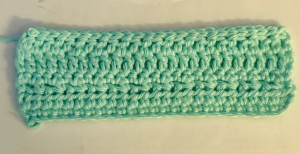
Well it’s all about muscle memory. And after reading about a trillion different crochet patterns you start to recognize some of the basic terms out in the wild. So let’s break this down one line and one term at a time.
Eight Basic Terms Explained
Guess what? You don’t have to memorize a dictionary just to get through a crochet pattern. Although sometimes it definitely feels that way. Beginner level patterns run on just a handful of terms and they will carry you through an overwhelming majority of things you’ll be making when you first start out. (And even beyond!)
So let’s break them down:
(Also if you need or want a refresher of how to make some of these basic stitches, I’ve got them linked to the tutorial for you right here)
1. ch (chain) is the foundation stitch and the one you’ll make more of than anything else. It’s also what most patterns start with and what gets used to add height at the beginning of a row.
2. sc (single crochet) is the shortest, tightest basic stitch. There are two ways that designers sometimes show you how many stitches to put where. For example, some will say sc 3, which means they want you to put a single crochet stitch in each of the next three stitches, one per stitch. Sometimes it will say 3sc, wihch means the same thing. Unless the pattern specifically says to put those stitches all in one stitch, just assume they mean one per stitch.
3. hdc (half double crochet) is the middle child. But unlike middle children, this one is a favorite of most crocheters. It’s taller than a single crochet, shorter than a double, and it makes a slightly squishier fabric than either one.
4. dc (double crochet) is the tall one. It works up fast and leaves more space between stitches. Blankets love this stitch, and it also produces a fabric that is slightly looser
5. skip (sk) This means exactly what it says. You completely skip a stitch and put nothing in it. On purpose. Usually because the designer wants a gap in that spot.
6. sl st (slip stitch) moves your yarn along without building anything on top. This is different from a skip because you are mostly just moving your yarn, but not trying to leave a gap or a hole. These two get confused a lot.
() and Repeat Sometimes Go Hand in Hand
7. ( ) parentheses These are used to group instructions together so the designer can tell you to do the whole sequence more than once. Whatever is inside the marks is the thing you’re repeating, and sometimes it’s not very clear that is what you are supposed to do. That’s why checking your stitch count at the end of the row is so important. (Sometimes the () get used interchangeably with **. Sometimes by the same designer in the same row of instructions. It’s not a failure on your part, and you didn’t miss anything.
8. Repeat is exactly as advertised. This is the designer saying, “that thing you just did? Do it again this many times” and usually has a number attached. So they can have a whole sequence of stuff inside the () and then say something like “Repeat () 5 times*.
There are more that show up in other patterns but by far these are the eight that show up the most frequently in most patterns.
Now let’s translate the whole thing, line by line
Let’s look at that whole scary block of shorthand nonsense we saw up top again. Breathe, it’s not going to eat you. We’ll be breaking this down term by term in just a minute.
Starting off:
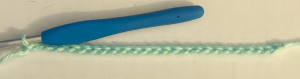
Ch 26 in plain English: make twenty-six chain stitches. This is your starting row. Most patterns do NOT count this as a row in their total count. This is what’s called the foundational row and usually just has a line like this with a sitch and a count. Usually just a chain and a number.
Row 1 in Plain English:
Skip the very first chain next to your hook, then put one single crochet stich into the second chain, and one into every chain after that until you run out of places to put your hook. Then make two chain stitches, and turn your work around. When you’re done you should have twenty-five single crochets sitting there.
That first skipped chain is not a mistake or a waste. This is what is called your turning chain, and it’s also what the 2 chain stitches at the end of the row are called. This is giving your work room to breathe, getting each row to be the same height at the beginning and the end, and making turning your work easier.
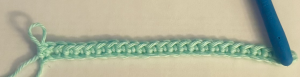
Row 2 in Plain English:
The two chains from the last row are already in place, and this row you’re not skipping the first stitch. You’re going to put one half double crochet into the first stitch from the previous row, and then one in each stitch across the row. Make one chain stitch, then turn your work. You should now have 25 half double crochet stitches.
You did 1 chain this time because the next row is a row of single crochet, and you don’t need the same height as you did for a row of half double crochet.
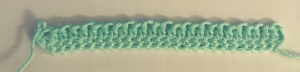
Row 3 in Plain English:
Since you already have your 1 chain made from the previous row, now you’re going to put a single crochet in the very first stitch. (Again you’re not skipping the first stitch because you already have your turning chain) Now this row likely looked the most overwhelming when you first glanced it, but it’s honestly not. All you’re doing is making one chain, skipping the next stitch completely, then putting a single crochet stitch in the next stitch after the skipped one. That’s the whole confusing repeat. Do that whole sequence twelve times total, then chain 1 (your turning chain to match the height of the upcoming row) and turn your work.
You’re going to end up with thirteen single crochet stitches and twelve little gaps. Remember how we skipped stitches on purpose? Yep, those gaps are the result of that, and they’re supposed to be there. You didn’t break it. This is what it’s supposed to look like.
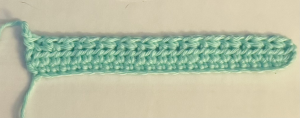
Row 4 in Plain English.
Here is where your brain can relax for a minute. All you’re doing in this row is putting one single crochet stitch into everything across this row. Everything including the little gaps you just made. When you get to the end you’ll have made twenty five single crochet stitches. Make two chain stitch and turn your work. (We’re getting height for the double crochet row coming next)
PRO TIP:
Keep count as you are placing stitches. Your eyes aren’t trained to count stitches out in the wild yet, so keeping count as you go is vital. (Besides, trying to count back your stitches at the end of the row is it’s own special kind of torture.) If someone is in the room distracting you, throw something at them while you’re counting to make sure you can keep track.
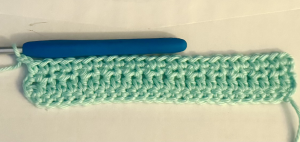
Row 5 in Plain English:
You’re doing the same thing in this row you just did with the single crochet, except now it’s a double crochet stitch. Place one double crochet stitch in each of the stitches from the previous row all the way to the end. This row is going to be noticeably taller than the previous row, which is what you wanted. Make two chains, and turn your work.
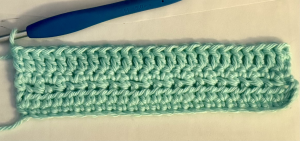
Row 6 in Plain English:
Here comes the part that might be confusing but I promise it’s not. This is the row with the (parentheses) in it. All that means is you’re going to do a sequence a set number of times. The sequence is (inside the parenthesis) and has a number attached telling you to do that sequence that many times.
So you’re going to do the following sequence twelve times. (Place one half double crochet in the first stitch, then a double crochet in the next stitch). Do that twelve times, then in your very last stitch of the row, place one half double crochet stitch. You will now have twenty five stitches total. Alternating tall, then short. Make one single chain as your turning chain and turn your work.
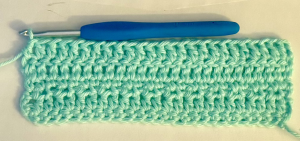
Row 7 in Plain English:
Here’s another easy row. All you’re doing is placing one single crochet stitch in each stitch across your row. We are not doing a turning chain in this row and you’ll see why in a minute. We don’t need height for the next row.
Row 8 in Plain English:
Remember how I said we don’t need height in this row? We don’t because we’re doing a row of slip stitches. All you’re doing for this row is a single slip stitch in every stitch across your row. Then you’ll break your yarn, tie it off and weave in the ends.
Okay that was a lot, can you go over a few things again?
Absolutely. Here’s a few things that are kind of foggy from one pattern to another, and things that get swapped out all the time without you realizing what happened.
Skipping a stitch and slip stitch are not the same thing
These two get mixed up constantly, and I understand why. Both of them look like nothing happened. (Even I sometimes still get confused!)
The difference is what you’re doing with the stitch underneath.
When you skip, you leave a stitch empty on purpose. You pass right over it, put nothing in it, and move on to the next one. You’ll end up with a hole in your fabric, and that hole is the whole point. Skips are how you get lacy patterns, mesh, buttonholes, and anywhere a designer wants open space. Sometimes skipping a stitch is used to pull the fabric in closer together by skipping a stitch and causing an intentional mild pucker. (This is also why your project might be puckering or pulling in at certain points, you might have unintentionally skipped a stitch)
When you slip stitch, you’re moving without building. You put your hook in the stitch, grab your yarn, and pull it straight through everything on your hook. Nothing gets taller. You’ve just relocated.
- Use a slip stitch when: you need to get somewhere without adding height, you’re closing a round, you’re moving over to a new starting position, or you’re putting a tidy edge on a finished piece.
- Use a skip when: the pattern is building a hole, a gap, or an opening on purpose, and usually you’ll see a chain right next to it filling in the space.
Your stitch count is the thing that saves you
See that number in parentheses at the end of every row? The (25 sc), the (13 sc, 12 chain spaces)? That is the most useful thing on the entire page, and will save your bacon more times than you think.
All that is just the designer telling you how many of what stitch you should have at the end of the row. Definitely make sure to count your stitches and compare to the count at the end of the row listed on the pattern, because catching a problem now takes thirty seconds and catching it on Row 47 means ripping out forty rows while you question every decision that led you here. (Ask me how I know)
And sometimes that number is wrong. A person typed it, that person was tired, and it happens more than anybody wants to admit. If your count is off by one in the exact same way on every single row, and the fabric looks fine, suspect the pattern before you suspect yourself. Or rip everything out and start over. Both are valid options. One just involves more sobbing than the other.
Bonus round: the stuff you’ll hit next
“Does not count as a stitch.” You’re going to see this constantly. It’s either going to say “does not count” or “counts as a stitch“. All it means is whether that little chain at the start of the row gets counted as one of your stitches in that row or not. Both are valid options, it’s literally just a design preference.
- The only thing I’d say about it is to pick a lane and stay in it.
If the turning chain counts, it counts for the entire project, every row, no exceptions. (Unless your pattern says otherwise) If it doesn’t count, it doesn’t count for the entire project. What you cannot do is have it count on Row 4 and not on Row 5, because that’s how you end up with an edge that creeps in on one side and no idea when it started going wrong.
(Which will then lead to the aforementioned frogging of your project mid mental breakdown)
A good rule of thumb to follow
(And how I do everything I make honestly) If a pattern is being cagey about whether your turning chain counts or doesn’t just default to not counting it. Use the chain to get the height you need, but don’t give it an identity. Meaning you just ignore it and start your next row with the first stitch indicated on the pattern. Just make sure to do it that way for the whole thing and check your count at the end of each row. If it lines up with the math on the page, you’re golden.
- And one last thing:
Chain spaces. When you chain over a gap (like we did in Row 3), the little opening that chain creates is called a chain space. (sometimes abbreviated ch sp) When a later row tells you to work into a chain space, you’re putting your hook into the hole itself, not into a stitch.
Final Thoughts: Back to Where We Started
We went from this scary overwhelming nonsense… to this lovely swatch!
It’s the same block of shorthand. It’s the same eight terms, same parentheses, and same stitch counts. The only difference now is that you can start to understand what is going on inside the mass of letters and symbols. Now it’s got a few different height stitches, a row of holes (because it’s fun) and a tidy little edge with the slip stitches.
When we first saw the pattern it was scary because it was overwhelming. It looked like a foreign language because it technically is one. It’s got it’s own vocabulary, it’s own grammar, it’s own rules, and some things count and some things don’t.
There are a ton more terms that are used in patterns, and I wasn’t ever going to be able to cover them all in one tiny blog post. But rather I hope this is a springboard to help you start understanding the underlying structure of a pattern, and to be able to start deciphering it without your a spell from Harry Potter.
So go make something with your newfound knowledge. And if you found this helpful tell me about it in the comments!
I needed this post so badly. I have basic crochet knowledge, but seeing a pattern without a visual reference is still hard. Thanks for sharing your post with us this week. This post will be a feature at the next party. #HomeMattersParty
Hi Donna!
The stitches are the easy part. Nobody warns you that the pattern shows up written in code, and there you are at 11pm with your emotional support Diet Coke going “sp? what the hell is sp” and refusing to look it up out of sheer stubbornness because you have been crocheting for twenty years and should know this. I sure hope this post saves someone some frustration or at the very least helps uncross their eyeballs a bit!
Thanks so much for the feature!
Amber
It’s as if you were reading my mind! Although I can do some basic crochet, my brain closes the tab when I see all of those pattern symbols. I have crocheted many a double crochet baby blanket for friends, back in the day. straight across! haha I’m happy to tell you I’ll be featuring this post at Thursday Favorite Things tomorrow. 🙂
Hi Pam!
I love me a good straight across double crochet baby blanket, and will not be taking notes on the subject. It’s quick, it’s easy, and I have not once cried over this stitch choice at 2am. However I feel your pattern reading frustration in my DNA. Hence the post. I am so glad that it hit for you and I hope it does the same for your readers as well.
Thanks so much for the feature!
Amber
[…] How To Read A Crochet Pattern by Amber @ Craft-a-Boo […]
I really appreciated the breakdown of how to decipher crochet abbreviations. It’s so easy to get lost in all the symbols and shorthand. Understanding the logic behind the pattern makes it feel way less daunting!
Sofia you are so right! The symbols make my have crosseye for like an hour after looking at them! Thanks for stopping by.
This article does an excellent job of breaking down the intimidating jargon found in crochet patterns. I especially appreciated the tip about taking it one stitch at a time; that really helps with managing the overall pattern.
Thanks Naomi! I am glad it could be of use to you!