
Textured Crochet Throw Pillow Pattern That Looks Store-Bought
Have you ever just wanted something homemade on your couch that didn’t have craft fair energy? Or scream “I made this at midnight in my basement while hiding from my kids”?
Same.
I wanted a pillow that looked like it walked out of a Crate & Barrel catalog but was still something I’d actually be proud to say I made. Plus I love tactile stuff—textures that make you want to touch things just because they exist.
Let’s get into the specifics of this pattern below.
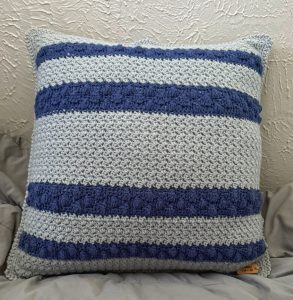
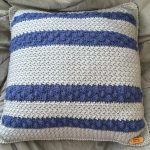
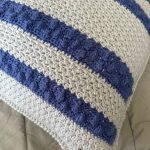
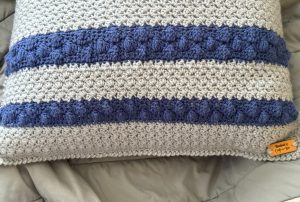
Her name is Harlow. She’s stripes, texture, and she minds her business.

Heads up: My posts may contain affiliate links! If you buy something through one of those links, you won’t pay a penny more, but I’ll get a small commission, which helps keep the lights on! Thanks!
The full written pattern is available as an instantly downloadable PDF here
This post is a photo guide + planning companion (materials, construction method and some FAQs).
Get the Printable Pattern PDF here:
Prefer to browse first? Keep scrolling for photos, sizing help, & FAQ
Get my free beginner crochet guide (for when your stitches look wrong and you’re convinced you’re the problem – spoiler alert, you’re not)
What’s on this page vs what’s in the PDF
On this page (your free planning companion):
- The full story behind why this exists
- What yarn I used (and what you can substitute if you hate Red Heart)
- FAQ for when your measurements are weird or your brain is spiraling
In the printable PDF pattern (paid)
- Complete walkthrough of how to create the front panel (with stitch counts, exact measurements and row by row tips)
- Guided directions on assembling the back panel
- The exact join method used, with bonus videos to help you through the process in real time
- Two different border finish options
- Full color printable PDF format
Make sure to grab your copy here:
Why I created this pillow pattern:
I wanted to create a piece of home decor that looked like I bought it for $127.95 at Anthropologie, and skipped the homemade vibes. I have lots of things in my home that I have made myself and am very proud of. But objectively, it looks like I made them. and I wanted a little more Pottery Barn, a little less Craft Fair, so I thought maybe other people would want the same thing.
Trying to nail down the vibe I wanted, I decided to go browsing on Pinterest, and then looked through Etsy. Nothing was checking all the boxes. Which meant I was going to have to figure this out myself, apparently. (as per usual)
Then I started experimenting, and when it started looking better than I imagined, I l knew I’d hit on something great. I began taking notes.
When I finished it, I tossed it on the couch, and immediately thought “oh, this actually looks like I bought it somewhere.” Not in a “I’m so talented” way. More like “huh, this doesn’t scream homemade project energy.” (You know, before both my dogs decided it was made especially for them, and got all cozy on top of it)
Turns out, when you stop trying to make crochet look like crochet and just focus on clean lines and texture that doesn’t yell at you, you end up with something that fits into an actual living room. You know, the kind that adults live in! The kind of pillow that just exists on your couch without needing to explain itself or apologize for being handmade.
So I wrote the pattern, and here we are. I hope you decide to try this, because nobody should have to decode abbreviations for three weeks just to make something cozy for their couch.
Let’s talk about some specifics.
What you actually need:
- Worsted weight yarn – I used Red Heart Super Saver because it’s cheap, holds up in the wash, and doesn’t make me cry when my dogs destroy things.
- 5mm hook, scissors, a yarn needle, stitch markers if you use them.
- Measuring tape – Usually I tell people this is optional but for this one you actually need it. You’re going by measurements, not row counts.
- 22″ pillow insert – I used this one from Amazon. You’re making a 20″ cover and overstuffing it slightly so it looks plump instead of sad and deflated.
Construction Method:
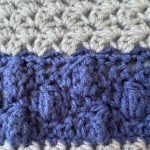
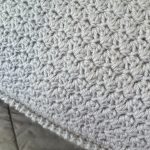
So, this pattern is a combo of two stitches. The moss stitch and a modified puff stitch, taking turns in stripes until you have a front panel. Then you make a back panel that’s just moss stitch because nobody cares what the back looks like and it goes faster that way. (Plus this makes a great excuse to just zone out and crochet. Put on your favorite show, bring snacks, and just have some me time)
The pattern walks through both stitches. Never done moss stitch? There’s a video. Puff stitch confusing you? Another video. The pattern assumes you can do a few basic stitches, and then explains the rest without assuming you have a PhD in yarn.
(I also include links to my stitch library here on the blog in case you need a quick refresher of some basic stitches. See? I’ve got you covered!)
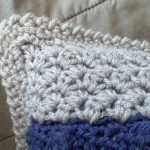
This is brave beginner territory—multiple techniques are happening to create Harlow. (stitches, color changes, joining two panels together, optional crab stitch border), but nothing individually is hard. It’s just new and slightly overwhelming if you haven’t done it before. The pattern explains it all so you’re not sitting there at 11 PM wondering if you’re doing it wrong. (You’re not, just keep swimming!)
-

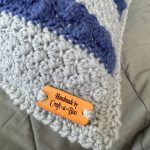
- The Harlow Pillow
FAQ about the Harlow Pillow
What size pillow insert do I actually need? I used a 22” square insert because I wanted a slightly overstuffed look to the pillow. You will be making a 20” square case, so if you aren’t digging the extra fluff, you can always get a 20” insert.
Do I have to use the exact same yarn or can I substitute? Absolutely not. You can use whatever yarn you like using the best. I do strongly recommend sticking to a worsted weight variety though, otherwise the sizing might come out different.
Do I have to use the crab stitch for a border? It looks complicated! Nope! You can absolutely skip this step if it looks overwhelming. I do include a walkthrough video of how to make the border, but if you’re at the end of the project and just want to be done, you definitely can skip it.
My measurements don’t match the row counts. Did I screw something up?
In this pattern, you will need to pay more attention to measurements rather than row counts. Make sure you are measuring at the end of each section to keep track of the sizing. If you’re running too tall, you can adjust by reducing the amount of moss stitch rows. If you’re too short, add a few more moss stitch rows to make up the difference.
Ready to make yours?
The Harlow Pillow looks more complicated than it is. There’s texture happening, stripes switching colors, two panels getting joined together—but none of that is actually hard. It’s just a lot of steps that add up to something that looks expensive when you’re done.
You can do this. I know your brain might be trying to convince you otherwise, but if you can follow instructions and ask questions when you’re confused, you’re already qualified. The pattern explains everything. The videos show you what’s happening. And if you get stuck or your brain starts spiraling, reach out. I actually respond.
Grab the pattern here: and go make something cozy that doesn’t apologize for existing.
Want more inspiration?
Check out my Home Decor Crochet Projects page for more patterns that actually look like they belong in your house.
New to crochet or need a refresher?
My Beginner Crochet Stitch Library breaks down all the basic stitches step-by-step, and my Project Tutorials & Techniques page walkthroughs for things like borders and color changes.
If you decide to make the Harlow Pillow, please share your project because I’d love to see it.
Happy Hooking!


