Crab Stitch Border Tutorial – How to Make Clean Textured Edges
So you’ve been crocheting for a minute now, maybe finished a few projects, and someone mentioned adding a “crab stitch border” to clean up those edges. And you thought, “What the hell is a crab stitch, and why does it sound like something that pinches?”
Good news: It doesn’t pinch. It’s actually one of the easiest ways to make your project look professionally finished instead of like you stopped mid-row and called it done.
Crab stitch (also called reverse single crochet, because that’s literally what it is) works backwards. You’re crocheting from left to right instead of right to left. Your brain will hate it for approximately 30 seconds, and then you’ll realize it’s just single crochet in reverse and wonder why you were ever intimidated.
This tutorial walks you through it step-by-step, with pictures, so you can add a clean, textured border to literally anything you make. Dishcloths, blankets, scarves, whatever. If it has edges, you can crab stitch it.
Let’s do this.
PS. I encourage you to get my free beginner crochet guide (for when your stitches look wrong and you’re convinced you’re the problem – you’re not). It’s 35 pages of “Calm down you’re fine” and it’s completely free!

Heads up: My posts may contain affiliate links! If you buy something through one of those links, you won’t pay a penny more, but I’ll get a small commission, which helps keep the lights on! Thanks!
Before we jump into the step-by-step, here’s the full video tutorial if you’d rather watch me fumble through this in real time. Sometimes it’s easier to see the hand movements than read about them, especially when your hook is going the “wrong” direction and your brain is screaming at you.
Watch it, pause it, rewind it as many times as you need. I won’t judge. (I had to watch someone else do this about twelve times before it clicked for me, so you’re in good company.)
If you’re more of a “show me pictures and let me figure it out” person, keep scrolling. I’ve got you covered either way.
Also, if you’d like to see an example of what this stitch looks like on an actual project, check out the Harlow Pillow Crochet Pattern.
Before you start adding crab stitch borders to everything you own, here’s what you’ll need:
- Crochet Hook – Whatever size you used for your project
- Yarn (Duh) – Same yarn from your project (or a contrasting color if you’re feeling adventurous)
- Your Finished Project – Dishcloth, blanket, scarf, whatever needs a border
- Scissors and a yarn needle – For weaving in ends when you’re done
That’s it. No special equipment, no weird tools you have to order from some obscure website.
What Is Crab Stitch, Actually?
Crab stitch is just single crochet worked backwards. Instead of moving from right to left across your work (if you’re right-handed), you’re going left to right. Your hook still goes through the stitch the same way, you’re still yarning over and pulling through, but the direction feels weird and awkward at first because you’re basically crocheting in reverse.
The result is a twisted, rope-like edge that sits on top of your work instead of blending in. It adds texture and structure, and it keeps your edges from curling or looking floppy. It’s the difference between “I think I made a thing” and “Holy crap! I made a THING! “
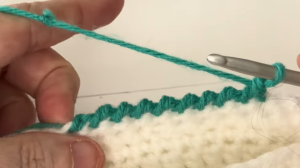
Traditional single crochet process works right to left. (If you’re a right handed person, I can’t speak for the lefties) This is natural to our crochet brains. This is how we work all of our stitches. But hold on, because you’re about to make your brain scream really loudly at you. (AKA the fun part!)
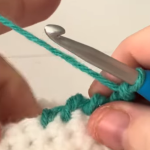
For the crab stitch (or reverse single crochet) you’re going to work left to right. (It’s backwards, your brain is screaming that you’re doing it wrong. Tell it to chill)
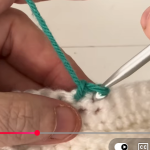
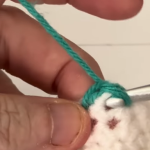
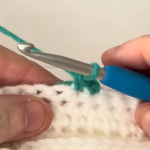
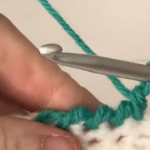
For this you’re going to insert your hook in the stitch BEHIND the turning chain stitch. Yarn over, and pull up a loop. Yarn over and complete your single crochet stitch.
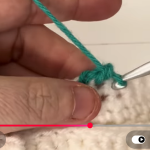
It feels weird because the yarn isn’t laying where it usually does. The result is the stitch is laying ontop of your work.
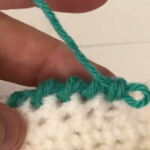
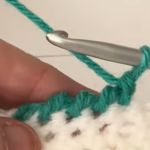
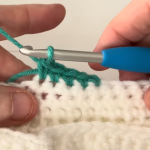
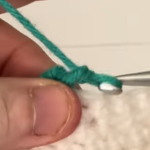
Now insert your hook in the next stitch, and repeat this process. Working the reverse single crochet is awkward at first, but by the eighth or ninth stitch you’ll start to get the hang of it.
When you get to the corners instead of adding the 3sc that we normally do, you can just keep going in the method you’ve been doing. This stitch naturally squares things up as you’re working it. It’s one of the best reasons to use it.
Crab Stitch FAQs
- Q: Can I use crab stitch on any project?
- A: Pretty much, yeah. As long as it has edges, you can crab stitch it. Blankets, dishcloths, scarves, amigurumi – whatever you’ve got. The only exception is if you’re working with really delicate yarn that might not hold up to the texture.
- Q: Do I need to use the same size hook as my project?
- A: Nope. You can go down a hook size if you want a tighter, more defined border. Or stick with the same size if you want it to blend in more. Most people just use whatever hook they already have in their hand.
- Q: Why does my crab stitch look messy?
- A: You’re probably pulling too tight because your brain is screaming at you that working backwards is wrong. Loosen up your tension and it’ll even out. Also, the first few stitches always look wonky – that’s normal. By the time you hit the corner, it’ll start looking right.
- Q: Can I use a different color for the border?
- A: Absolutely. Contrasting colors make the crab stitch pop even more. Just join your new color where you’d normally start the border and go from there.
- Q: What if I’m left-handed?
- A: Reverse everything. You’ll be working right to left instead of left to right, which actually means you’re doing regular single crochet. Welcome to your one advantage in the crochet world!
Now Go Make Everything Look Finished
You just learned how to crochet backwards. Congratulations, your brain hates you.
But now you can slap a border on anything and make it look like you actually planned the whole thing instead of winging it and hoping for the best. Start with a dishcloth – low stakes, easy edges, and if you screw it up you’re only out like 20 minutes of your life. Once you’ve got the backwards motion down and your hands stop trying to mutiny, move on to bigger stuff.
That blanket that’s been sitting in your closet for six months because you didn’t know what to do with the edges? Crab stitch. The scarf that curls up like it’s trying to escape? Crab stitch. Literally anything with an edge that looks unfinished? You guessed it.
If you’re still trying to nail down some basics without throwing your hook across the room, I have got you covered. The foundation for the crab stitch is the single crochet and I’ve got a whole ass tutorial right here. I also cover how to change colors in your project right here.
And if you want something beginner-friendly to practice on, head over to the free beginner friendly pattern section. The whole place is designed for people who are still in the “am I doing this right or is this a disaster” phase of learning.