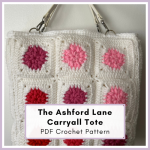
So, I might have a confession to make. I have a granny square problem. Not a “made a few for a blanket” problem. A “there’s a bag in my closet full of single squares that never became anything and we don’t talk about it” problem. (Ask me how many. Actually, don’t.)
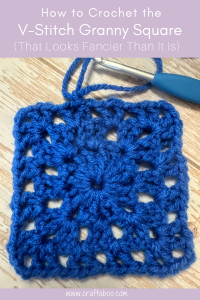
And of those uncountable little bastards that keep popping up from corners of my home I forgot existed, the a good chunk of them happen to be the V-stitch granny. Why you might ask? Well it’s simply because it’s sneaky. It looks lacy and delicate and like it took somebody’s great-grandma three weeks and a prayer. It took me about 30 minutes and one Diet Coke.
If you’ve already made a classic granny square, you know 90% of this one. Same magic ring, same rounds, same four corners. The only thing that changes is the stuff between the corners. Instead of clumping three double crochets together, you’re making two double crochets and a chain. Every round, each new V sits right down inside the one below it, and the whole square kind of lines itself up while you’re busy yelling at the TV.
It’s really not that serious. I promise.
BTW: if one square turns into twelve (it will, ask me how I know), I made a free cheat sheet for what to do with the pile. Pick how many squares you’ve got, click the link, and it’ll take you straight to a Pinterest board full of things you can make with them.
Grab it free right here.
Heads up: My posts may contain affiliate links! If you buy something through one of those links, you won’t pay a penny more, but I’ll get a small commission, which helps keep the lights on! Thanks!
Solid Squares vs. Holey Squares (And Where This One Lands)
Okay so here’s the deal with granny squares. There’s basically two kinds. The solid ones, and the ones with holes in them. (Groundbreaking, I know. Somebody get me a research grant.)
The solid ones are the overachievers. No gaps, no air, no drama. They’re thick and warm and sturdy, the kind of square you want in a blanket that has to survive kids, dogs, and a whole lot of Netflix.
The holey ones are a whole different vibe. They’re lighter, drapier, and they let some air through, which is great for a summer throw and less great when your toes keep poking out the bottom of the blanket at 2am. The classic is the poster child for this camp. The moss sits on the edge of it, with holes so tiny you’d almost swear it was solid. Almost.
So where does the V-stitch land? Firmly on team holes, sis, but it’s the dressed-up version. It’s airy and lacy and the V’s line up all neat and pretty, so it looks like it belongs on a fancy throw pillow instead of in grandma’s attic. Nobody has to know it was just a Tuesday night on the couch.
Before we dig in, here are some helpful links no hunting required:
● My Go-To Supplies – The hooks and supplies I reach for every single time
● Yarn – Because duh
● Stitch Library – A place to brush up on your basic stitches if you need to so the rest of this makes sense.
Free V-Stitch Granny Square Pattern At-A-Glance
Skill Level: Beginner
Finished Size: (This sample is 6” square, but you can make it as big or little as you like!)
Materials Needed:
Yarn: A granny square can literally be made from all weights of yarn. However for this specific tutorial we’re going to be using medium worsted weight yarn. I used Red Heart Super Saver in the color blue, but you can use whatever you have.
Hook: You can use whatever size hook your pattern calls for, but for this square, we’re using a 5.0mm hook. (H size)
Yarn Needle, Scissors, Tape Measure – To cut yarn, weave in ends, and make sure you got the size you were looking for.
(Babysitter, Netflix, Diet Coke, Snacks) – And a locking door on your bedroom so you can have some much deserved me time.
Time to Make: About 30ish minutes once your hands understand the assignment
Making the V-Stitch Granny Square:
Stitches Used: (If any of these stitches feel unfamiliar, I’ve got you covered here)
● SL St- Slip Stitch
● Ch- Chain
● DC- Double Crochet
This starts with a magic ring. If you don’t know how to make one yet, go watch my magic ring tutorial first – otherwise you’re just going to be stuck at step one wondering what you’re supposed to do. (In case you don’t want to learn a new skill right now, you can just ch3 and sl st to the first chain to form a ring.
To Begin:
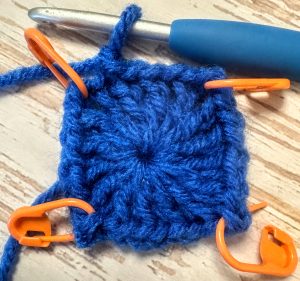
Round 1: Start by forming a Magic Ring, ch1 to secure. Then in the ring make 1dc, ch1, 1dc to form your first V-Stitch. This is the first side of your first corner.
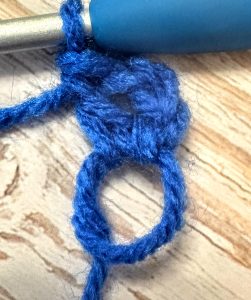
Then ch2, (this makes the corner space) and make one more V-Stitch. (1dc, ch1, 1dc).
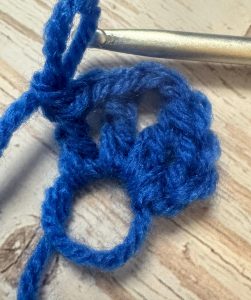
You have now formed your first corner. Repeat ***(1dc, c1, 1dc) ch2 (1dc, ch1, 1dc)*** three more times to finish all four corners. When you get back to the beginning, sl st to the top of your first dc.
(End of round 1 with stitch markers on corners)
(End of round 1 without stitch markers on corners)
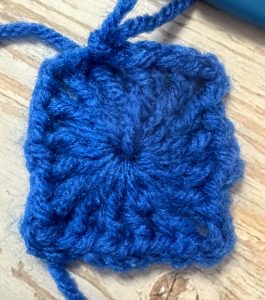
IT IS VERY IMPORTANT that you make sure you’re turning your work after every round so your stitches don’t come out looking like they were drunk and getting twisted.
Round 2: Ch1, turn your work.
- Starting in the ch1 space right next to your hook from the previous round, place 1 v stich (1dc, ch1, 1dc) then ch1 to get to your corner
- Make your corner just like the previous round. ***(1dc, c1, 1dc) ch2 (1dc, ch1, 1dc)***.
- Ch1, then put 1 v stitch (1dc, ch1, 1dc) in the ch1 space from the previous round
- ch1 and you’re at your next corner
- Repeat this around to form the rest of the corners, making sure to place 1 v stitch in each ch1 space between corners.
- Sl st tp the top of the first dc stitch
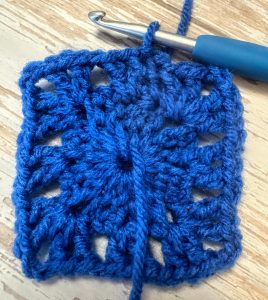
Still with me? Good. You’re doing great.
If your square doesn’t look like mine right now, congratulations, you crocheted it. You’re human, not a machine and we’re all still learning. Let’s keep going!
Round 3: Ch1, turn your work.
- Starting in the ch1 space right next to your hook from the previous round, place 1 v stich (1dc, ch1, 1dc) then ch1 to get to your corner
- Make your corner just like the previous round. ***(1dc, c1, 1dc) ch2 (1dc, ch1, 1dc)***.
- Ch1, then put 1 v stitch (1dc, ch1, 1dc) in each of the next 2 ch1 spaces
- ch1 and you’re at your next corner
- Repeat this around to form the rest of the corners, making sure to place 1 v stitch in each ch1 space between corners.
- Sl st to the top of the first dc
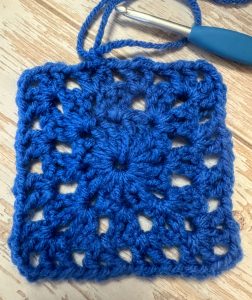
Round 4 and Beyond: From here on out you’re hopefully seeing the pattern forming in this granny square.
- Each corner gets a v-stitch, ch2, v-stitch, then a ch1 to the next space.
- In each space between the corners, place one v-stitch and a ch1.
- Every new round gets one more V between corners than the round before it, so Round 4 has 3, Round 5 has 4, and so on.
- Turn your work between rounds.
- Sl st to the top of the first dc when you’re back at the beginning.
This square (just like all granny squares that have ever granny squared) can be made into whatever size your heart desires. Want something small and compact? Or are you more of a “little is good but bigger is better” kind of girlie? This square would look great at both sizes.
And if you’re a “Hey I need a visual record or I can’t follow along” kind of learner, I got you covered. I made a YouTube tutorial below that you can pause, rewind slow down or speed up as you need.
Some “oops” moments to watch out for.
(You’re human and learning. These are normal.)
Q: My square is just a mess of loops and weird looking stitches. What is happening?
A: Your stitch count is probably off. Yep, sometimes we really do have to count every stitch if we want things to behave. Go back to where it first started looking weird, rip that sucker out, and try again. This time, put the kids on mute so you can keep count, and it usually fixes itself.
Q: My corners don’t look like yours. How do I fix it?
A: If your stitch count is right, try gently tugging the corners to square it up. Don’t yank the yarn like it owes you money. Just coax it a little. Stretch the stitches between your fingers, smooth things out, and see if it starts to behave. If you’re still unsure, work the next round and check the previous one. When the corner evens out, you’re golden. If not, frog it and start over. Also, I cannot stress enough how much stitch markers help keep your counts straight. Sometimes we can’t spot our stitches out in the wild, and we need a little visual help.
Q: I keep ripping out stitches, nothing is working, and I feel like I can’t do this. What’s wrong with me?
A: Sis, nothing is wrong with you. You’re learning. That’s the deal. The only way this gets easier is by doing it, and crochet is very forgiving like that. The more you practice, the smoother your stitches get, the easier it feels, and the more your brain goes hey, I like this. I promise it gets easier and more fun the longer you stick with it.
Final Thoughts:
You did it. You took everything that classic granny square taught you, swapped the clusters out for a double crochet and a chain, and walked away with a square that looks like it came off a shelf in some overpriced boutique. (Nobody needs to know how easy it was, or that you completed it while watching an episode of Friends for the 413th time. Your secret is safe with me)
If any of those stitches still feel a little wobbly in your hands, the crochet stitch library has every basic broken down step by step, slow enough to actually follow along. And if this one square just turned into a sudden urge to make twelve more, the granny square collection is sitting right there with the classic, the solid, and a whole pile of others waiting their turn.
Want some company while you make them? This square is part of my free Scrappy Granny Square Sampler CAL, where we’re building an entire blanket one granny square at a time. Grab your scraps and jump in whenever you’re ready. Nobody’s taking attendance.
Happy Hooking!