So you did it. You bought the hook, and likely more yarn than you needed (probably a skein of Red Heart Super Saver in a color you’ll question later). You sat down, opened your very first pattern, and the very first instruction said “ch 20.”
Cool. Great. Love that for you.
Except nobody told you what “ch” means, how you’re supposed to make twenty of them, or why the yarn is already wrapped around your wrist like it’s trying to escape. Every pattern on the planet acts like you came out of the womb knowing how to chain, and now you’re staring at a stick and some string feeling like you missed a class everyone else took. (You didn’t. Nobody took that class. We all just faked it until it worked.)
Here’s the good news. The chain stitch is the first stitch in almost every crochet project, and it’s honestly the easiest one you’ll ever learn. Once you’ve got it, “ch 20” stops being a riddle and becomes the part you knock out before your Diet Coke even gets warm.
This tutorial walks you through it slowly, with photos for every step and a video for when you need to see it happen in real time (with a pause button for when your brain starts yelling). Let’s get into it.
Panicking about starting crochet? I was there and I see you.
I made a free guide for anxious beginners who need someone to talk them off the ledge before Row 1. No nonsense, no “believe in yourself” speeches. Just the actual things you need to know so you don’t spiral at 2am wondering if you’re doing it wrong. (Spoiler alert: you’re not) Grab the Don’t Panic PDF
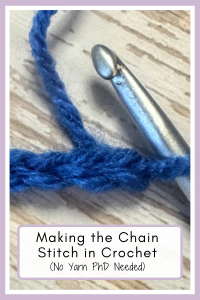
Heads up: My posts may contain affiliate links! If you buy something through one of those links, you won’t pay a penny more, but I’ll get a small commission, which helps keep the lights on! Thanks!
What is the Chain Stitch?
The chain stitch is exactly what it sounds like, which is rare and beautiful in a craft that also has something called a “crab stitch.” It’s a row of loops, each one pulled through the one before it, linked together like those paper chains you made in second grade with way too much glue.
Most of the time, the chain is how a project starts. You make a long row of chains (called the foundation chain), and every other stitch in your project gets built on top of it. So when a pattern says “ch 20,” it’s telling you to make twenty of these loops so the rest of the project has somewhere to live.
But chains don’t just hang out at the beginning. They sneak into the middle of patterns too.
You’ll see them as turning chains, the one or two chains you make at the end of a row to get your hook up to the right height before you start the next one (and they usually don’t count as a stitch unless your pattern says they do). You’ll also see chain spaces, which are little gaps made on purpose by chaining a few stitches and skipping over some. Granny squares are basically held together by chain spaces and stubbornness.
So yes, it’s the “easy” stitch. It’s also the one you’ll use in literally every project you ever make, which is why it’s worth getting comfy with before anything else.
Before we dig in, here are some helpful links, no hunting required:
● My Go-To Supplies – The hooks and supplies I reach for every single time
● Yarn – Because duh
● Stitch Library – Where to head next once your chain actually looks like a chain.
Chain Stitch At-A-Glance
Skill Level: Total beginner (like, “I bought my first hook yesterday” beginner)
What You’ll Make: A practice chain as long as you want. (Mine always ends up long enough to lasso the dog.)
Materials Needed:
Yarn: Any medium worsted weight (#4) yarn in a light, solid color so you can actually see your loops. Use whatever you have, or impulse bought at the craft store.
Hook: A 5.0mm (H size) hook. It’s big enough to see what’s happening and small enough to not feel like you’re crocheting with a broom handle.
Scissors – To cut your yarn when you’re done practicing (or when you need a fresh start, no judgment).
(Babysitter, Netflix, Diet Coke, Snacks) – And a locking door on your bedroom so you can have some much deserved me time.
Time to Learn: About 10ish minutes once your hands understand the assignment
Making the Chain Stitch:
To begin we’re going to make a slip knot: Follow along with the photos below, moving left to right..
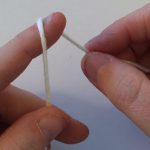
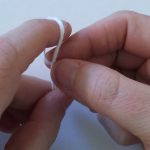
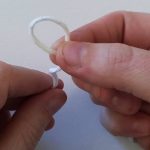
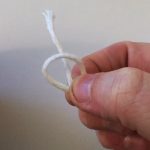
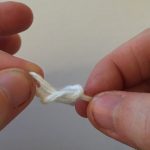
- Drape your yarn across the tip of one finger so it bends in the middle.
- Wrap it around so the yarn crosses at the bottom and makes a loop on top, then pinch the loop to hold it.
- Slip your pointer finger out of the loop.
- Bring the tail up behind the loop and pinch it so it peeks through the middle.
- Grab that middle piece and pull it through the loop to make your slip knot.
Next: We’re Getting Your Hook Ready: Follow along with the photos below, moving left to right.
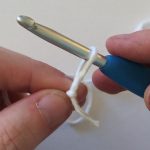

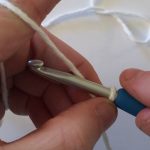

- Slide your hook into the loop of your slip knot.
- Gently tug the tail so the loop snugs around your hook (snug, not strangled).
- Pinch the bottom of your slip knot with two fingers.
- Bring your hook to the left of your working yarn, which is the yarn coming off your ball or skein.
And Finally, We’re Making the Chain Stitch: Same deal, follow the photos below, left to right.
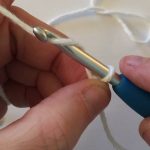
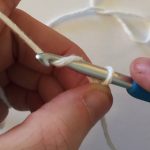

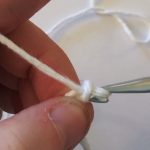

- Slide your hook behind the working yarn with the hook part facing away from you.
- Turn the hook toward you so it grabs the working yarn.
- Pull the hook down toward the loop that’s already on it. (The loop from the slip knot)
- Keep pulling, and you’ll see the grabbed yarn slide through that loop.
- Pull it all the way through, and you’ve made one chain stitch. Repeat this process until you have as many chains as your pattern calls for. (or enough rope to lasso the cat, or your child. No judgement)
And if you’re a “I need to see this in real time with a pause button” kind of learner, I’ve got you covered. I made a quick tutorial video below for you to check out.
Some “oops” moments to watch out for.
(You’re human and learning. These are normal.)
Q: My chain is so tight I can’t even get my hook back into it. What is happening?
A: Your tension is tight, and that’s the most common beginner thing in the world. Loosen your grip on the yarn (you’re not holding it hostage) and try pulling each new loop up onto the wide part of your hook instead of the skinny tip. If it’s still fighting you, go up a hook size just for your starting chain. Your future self trying to work into that chain will thank you.
Q: I lost count of my chains. How do I count these things?
A: Look at the front of your chain and you’ll see a row of little sideways V’s. Each V is one chain. The loop sitting on your hook doesn’t count, and neither does the slip knot, so start counting from the first V next to the knot. If you’re making a long chain, clip a stitch marker in every 10 or 20 so you only have to count a little chunk when you lose your place. (And you will. We all do.)
Q: My chain keeps twisting and I keep starting over. What’s wrong with me?
A: Sis, nothing is wrong with you. You’re learning. Twisting just means the chain flipped while you were working, so lay it flat, untwist it gently, and keep going, or frog it and start fresh if it’s driving you nuts. The more chains you make, the more your hands figure out what they’re doing, and one day you’ll realize you made fifty without thinking about it.
Final Thoughts:
You did it. You took a stick and some string and made an actual chain, which means “ch 20” is no longer a riddle written in a secret language. That little row of V’s is the start of literally everything you’ll ever crochet, and you just made it with your own two hands. (Even if it’s a little lumpy. Lumpy counts.)
When you’re ready for the next step, the single crochet tutorial picks up right where this one leaves off and shows you what to actually do with that chain. And if you want to see every basic stitch in one place, the crochet stitch library has them all broken down step by step, slow enough to actually follow along.
Once a few stitches start to feel familiar, my beginner friendly projects only use the stitches you already know, so nothing new is going to sneak up on you halfway through.
And if you’re the kind of person who stares at twelve wobbly chains convinced you’ve already ruined everything and should just quit, I made a free guide specifically for that exact moment. It’s called Don’t Panic, and it exists because we’ve all been there, spiraling over a few lumpy loops nobody else will ever notice. It’s completely free and you should go grab it.
Happy Hooking!