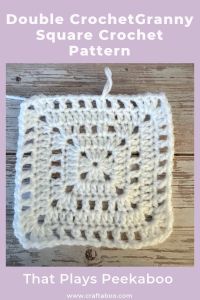
Every once in a while I’ll be scrolling through crochet photos when I should absolutely be doing literally anything else, and a square pops up that makes me put my hook down. This was one of those. It was a granny square with neat little holes running around it in rows like tiny windows, and my brain went straight from “oh, that’s cute” to “I need this immediately or I will perish.”
Except there was no pattern. No link, no designer, not even a name. Just one lonely photo and me, zooming in on my phone and trying to count stitches like I was cracking a cold case (it does not work, the pixels refuse to cooperate).
So I did what any stubborn, slightly over-caffeinated crocheter would do. I grabbed my hook and figured it out myself, one round at a time, until the square in my hands finally matched the one on my screen. It still didn’t have a name, so I gave it one. Say hello to the Peekaboo Granny Square.
And the sneakiest part? It looks like you’d need some kind of secret crochet degree to pull it off, but this easy double crochet granny square is built from the exact same moves as a traditional granny and a solid one. Nothing new to learn. We’re just tossing the stuff you already know into a blender and acting like we planned it that way.
Panicking about starting crochet? I was there and I see you.
I made a free guide for anxious beginners who need someone to talk them off the ledge before Row 1. No nonsense, no “believe in yourself” speeches. Just the actual things you need to know so you don’t spiral at 2am wondering if you’re doing it wrong. (Spoiler alert: you’re not doing anything wrong, you’re just new and learning) Grab the Don’t Panic PDF
Heads up: My posts may contain affiliate links! If you buy something through one of those links, you won’t pay a penny more, but I’ll get a small commission, which helps keep the lights on! Thanks!
So What Makes This One Different?
Honestly? Not a whole lot, and that’s exactly why I love it.
A traditional granny square is all about the gaps. Clusters of double crochet with little chain spaces tucked between them, so the whole thing comes out airy and lacy and basically begging to be thrown on the back of a couch. A solid granny square is the total opposite. Double crochet in every stitch, wall to wall, no gaps allowed, like a granny square that went through a very strict phase.
The Peekaboo Granny Square can’t pick a side, so it does both. Some rounds go solid, and some rounds sneak a chain in between the double crochets to open up those little windows. It switches back and forth until your square is as big as you want it. (I know. I was a little offended by how simple it was too.)
So if you’ve made either of those squares before, congratulations, you’re already qualified. And if you haven’t, this is a sneaky good beginner granny square anyway, because you’re basically learning two squares for the price of one and walking away with a granny square with holes that looks way fancier than the effort you put in.
A Few Helpful Links Before We Start (So You Don’t Have to Hunt)
- My Go-To Supplies – Every hook, marker, and tool I grabbed for this square
- Yarn (duh) – For when your stash is mysteriously out of the one color you need
- Stitch Library – Every basic stitch, ready for whenever your hands forget what double crochet is
Peekaboo Granny Square At-A-Glance
Skill Level: Beginner (double crochet and chain are the only two stitches showing up to this party)
Finished Size: My sample came out about 6″ square, but every round makes it bigger, so stop before it grows big enough to take over your living room
Materials Needed:
Yarn: Medium worsted weight (#4) yarn. I went with plain white Red Heart Super Saver, because those little peekaboo windows show up best on a light colors. Dark yarn hides them, and then what was the point?
Hook: A 5.0mm (H size) hook. Go too big and your windows turn into garage doors.
Yarn Needle, Scissors, Tape Measure – For trimming tails, tucking them out of sight, and measuring so you know when to call it.
(Babysitter, Netflix, Diet Coke, Snacks) Plus a pair of headphones, so you can pretend you didn’t hear anyone ask what’s for dinner.
Time to Make: Around 30 to 45 minutes, depending on how many times you stop to admire the windows.
Stitches Used: (If any of these feel fuzzy, the Stitch Library will get you back up to speed)
- Ch – Chain
- Sl St – Slip Stitch
- DC – Double Crochet
- Ch-1 Space – The little gap a single chain leaves behind. These are your peekaboo windows, and you’ll be working into them on the rounds after you make them.
To Begin:
Start by creating a magic ring. (If that is a technique you’re not comfortable with yet you can also just chain 3 and sl st to the first chain to form a ring.) I also have a tutorial for the magic ring right here if you want to brush up.
Round 1: Ch2 (doesn’t count as a stitch). Into the circle make 3dc, ch2 four times to make 12dc and four ch2 spaces. Sl st to the top of the first dc stitch you made.
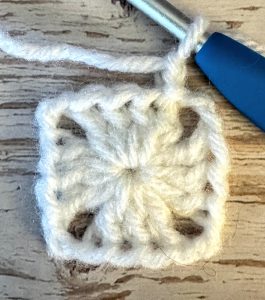
Round 2: Ch2, then make 1dc in the top of each dc you just made until you hit the corner. In the corner make 2dc, ch2, 2dc to form the corner. Continue making one dc into the top of each dc stitch from below and a corner in each ch2 space. Sl st to the top of the first dc you made to start.
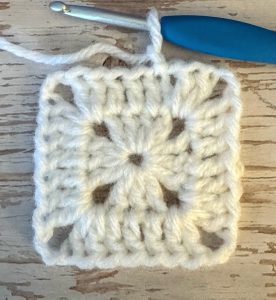
Round 3: Ch2, then make 1dc in the joining stitch (the same stitch you just slip stitched into), then ch1. Skip the next stitch, and make 1dc in the next dc. Ch1, skip 1, 1dc in the next stitch. When you get to the corner, make 2dc, ch2, 2dc to form the corner. Keep going like this all the way around and slip stitch into the top of the first dc where you started.
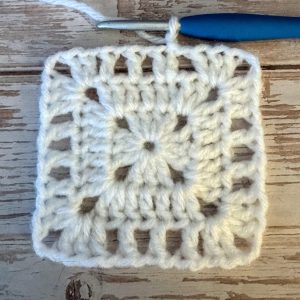
Round 4: For this round we’re doing exactly what we did in round 2. Ch2 to start, and then place 1dc in each stitch and each ch1 space until you get to your corner. Then repeat your 2dc, ch2, 2dc to form the corners. Finish off by slip stitching to the top of the first dc that you made to start.
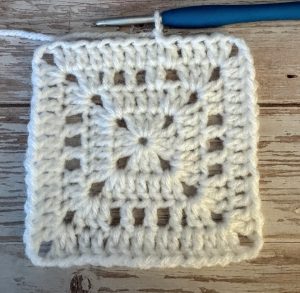
Round 5: This is a repeat of round 3. Start by doing a ch2 and place 1dc in the joining stitch. Ch1, skip a stitch, and do 1dc in the next stitch. Do this on each side until you get to your corner. Then repeat your 2dc, ch2, 2dc to form the corner. Continue all around and slip stitch to the top of the first dc from where you started.
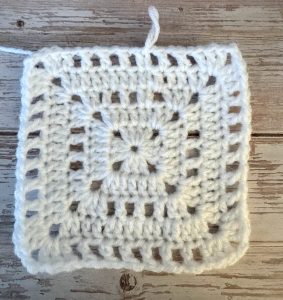
Round 6 and Beyond: From here on out, the square just takes turns. One round is a solid round, with 1dc in every stitch and every ch1 space, just like Round 4. The next round is a window round, with the ch1, skip 1, 1dc pattern, just like Round 5. Keep switching back and forth between the two until your square is as big (or as small) as you want it, whether that’s one cute little coaster or a stack of squares for a whole granny square blanket.
If you’re more of a “I need to see it in action and have a pause button” kind of learner, I’ve got you covered. Check out the video tutorial below.
Some “oops” moments to watch out for.
(You’re human and learning. These are normal.)
Q: My windows don’t line up with each other. Some are crooked and some are bunched together.
A: That usually means a stitch got skipped or doubled up on the window round. Every window needs a dc sitting right on top of a double crochet stitch from the round below, with the ch1 hopping over the stitch in between. If you’re working along and suddenly have two double crochet stitches right next to each other, or two chains in a row, back up to the last window that looked right and frog to there.
Q: I put my square down to chase the toddler and now I have no idea which round comes next.
A: Your square will tell you. Look at the round you just finished. If it has holes, your next round is a solid one. If it’s solid, it’s time for windows. It’s a granny square that keeps its own diary, so you never have to remember.
Q: My square is starting to ruffle (or curl up like a bowl). What happened?
A: On the solid rounds, every ch1 space needs its own dc. If you skip over the spaces, the square tightens up and starts cupping. If you stuff extra stitches in there, it gets wavy around the edges. One dc in each stitch and one in each ch1 space keeps everything nice and flat.
Q: My holes are all different sizes.
A: That’s just tension, and it happens to everybody. Try to make every ch1 about the same size as the loop already on your hook, instead of yanking it tight or leaving it loose and floppy. They’ll even out the more rounds you make, and a little blocking at the end hides a lot of sins.
Final Thoughts:
So there you have it. A square I found in a random photo with no pattern and no name is now sitting on your table, and you made it with nothing but double crochet, a few chains, and a little bit of stubbornness. Not bad for a free granny square pattern that started out as one lonely picture.
The best part about this double crochet granny square is how easy it is to keep going. Make one as a little coaster, or crank out a whole pile and turn them into a granny square blanket that looks way more complicated than it really was. (Nobody needs to know how simple it was. Your secret is safe with me.)
And if one square turns into twenty and you’re staring at a pile wondering what to do with all of them, I made a free cheat sheet just for that. Now go make another one, because I already know you want to.